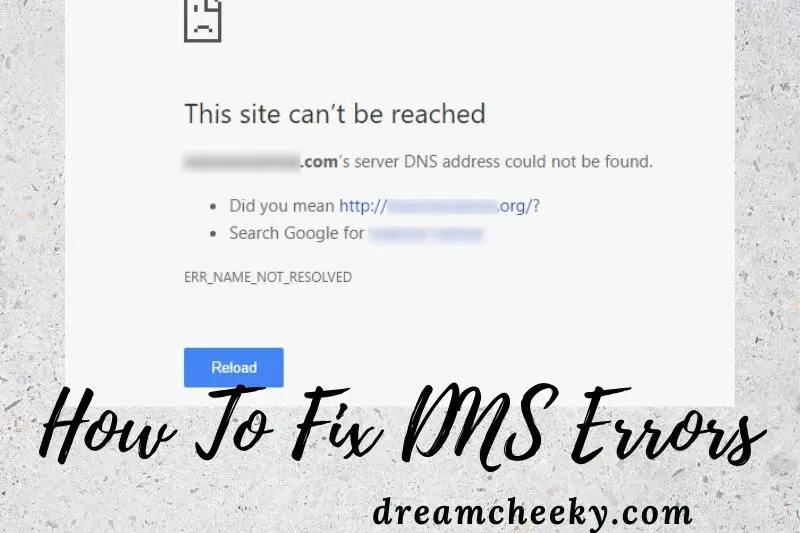
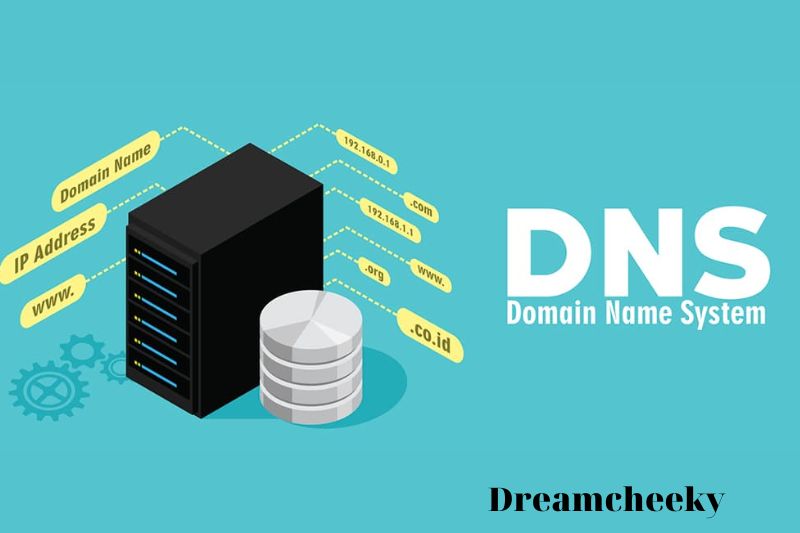
If you’re having trouble connecting to the internet, there’s a good chance you’re experiencing a DNS error. DNS, or Domain Name System, is a server that translates domain names (like www. example. com) into IP addresses.
If your computer can’t communicate with a DNS server, you won’t be able to load websites. Fortunately, there are a few things you can do to fix DNS errors.
What is DNS?
DNS converts your written commands into a numerical IP code that matches the web page you’re looking for. Our language is not understood by the internet server. Instead, it connects to and loads websites using a numerical IP address scheme. DNS is responsible for converting what we write into a numerical IP address that the DNS server recognizes.
Even if your computer or router shows a good internet connection, you won’t be able to access web-connected services like your browser or email if DNS isn’t operating properly. The page may time out, display an error message, or display a specific “DNS problem” message.
Signs of a DNS error
How can you know if your difficulties are caused by a DNS issue if you don’t get a specific DNS error or message? Here are two methods you can use to learn more:
Directly into your browser, type the numerical IP address. If the webpage loads, the issue is most likely DNS-related. You might try using Google’s IP address, which is “172.217.4.46.”
By typing “cmd” into the Windows Start Menu search bar, you may run a ping test. Choose Open Command Prompt from the drop-down menu. When the dark box appears, type “ping 172.217.4.46” and wait for the results to appear. It could be a DNS issue if all four pings are successful.
A ping test can also be used to determine the numerical IP address of any website. Step 2 is repeated, however this time type one of the following into the black box:
- ping Amazon.com
- ping Google.com
- Alternatively, the site you want to test
Keep an eye on the ping test results to see what IP address pops up.
DNS Troubleshooting
Check cables
If you’re using a wired connection, double-check that everything is in working order. Check to see if WiFi is turned on and connected to wireless networks. Check to see sure all cables are connected to the router. Attempt to test the connection by switching ports for ethernet cables.
Scan for malware
Viruses can occasionally prevent you from accessing the internet. Run a scan to check if anything strange pops up, and then proceed as necessary.
Check the website
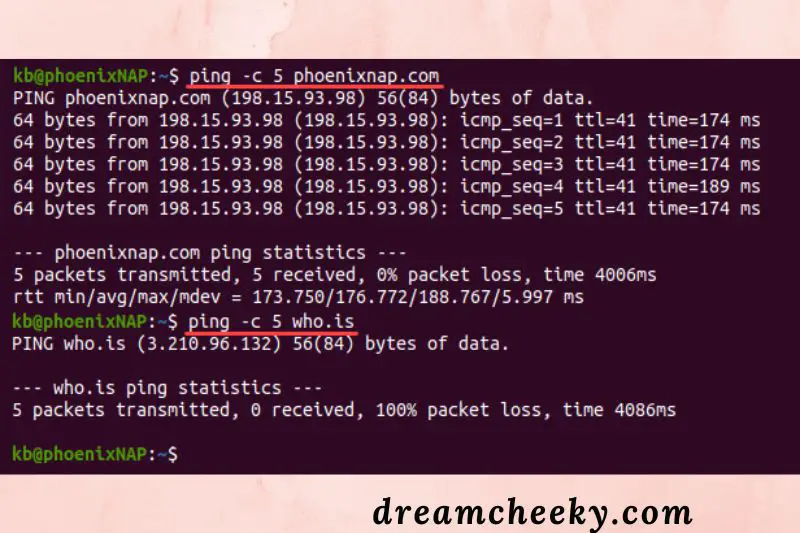
If you’re having trouble connecting to a specific website or a section of a website, see if the issue is with the website itself. The ping command is one way to accomplish this.
The output of the Command can assist in determining the cause of the connection problem:
If you don’t get a response from ping, the problem is most likely on the server’s end.
A poorly configured DNS server or firewall restrictions are major causes of response errors. Find out how to fix the error “Temporary failure in name resolution.”
If there is a response in the output, the issue is most likely with the DNS.
The following list of helpful hints for troubleshooting DNS difficulties is extensive.
Restart router
Turn off the router and wait at least two minutes before restarting it. Recheck the connection after the router has fully booted up.
Check TCP/IP Settings
DNS server addresses that have been misconfigured are a regular problem. Check to see whether the communication is back to normal after resetting the settings. The instructions vary depending on which Operating System you’re using.
For Windows users:
- Open Network Status by searching for it in the Start menu.
- Go to the Network Connection Details section and select Properties.
- To alter the IP settings, click the Edit button.
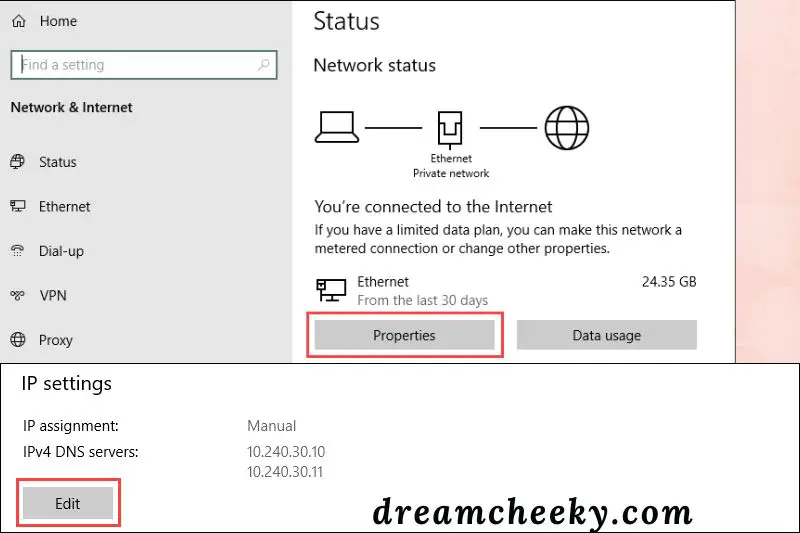
- Double-check the IP, Preferred, and Alternate DNS addresses if the IP assignment is Manual. To return to normal, change the IP assignment to Automatic (DHCP) from the dropdown option.

- When you’re finished, save the settings.
For Linux users:
- In the top-right corner, click the connection icon.
- Select Wired Settings from the menu.

- To access the settings, click the gear symbol in the connection window.
- In the settings menu, go to the IPv4 tab.

- Double-check the Address and DNS IP address lists if they were manually assigned. To restore normalcy, select the Automatic (DHCP) option and alter the
- DNS switch to Automatic.
When you’re finished, apply the changes and close the window. Finally, double-check the connection to confirm everything is working properly.
Flush the DNS Cache
Malicious assaults on IP mapping to prominent websites are common. DNS caches information to increase loading speed, and it can store an incorrect address. When you clear the DNS cache, it removes all of the lookup data and refreshes it with subsequent requests.
In general, flushing the DNS cache is a smart security precaution to perform. For detailed and OS-specific instructions, see our tutorial: How to Clear DNS Cache on Mac OS X, Windows, and Linux
Release and Renew DHCP Server IP
By refreshing the cached information, releasing and renewing the IP address helps resolve an IP conflict and old DNS information. The command prompt/terminal is the simplest way to perform a release and renewal.
The PC will be disconnected from the internet if the IP is reset.
On Windows, use the command prompt to renew the IP address:
1. To release the current IP address and renew the information, run the following commands:
- IPCONFIG /RELEASE
- IPCONFIG /RENEW
2. Double-check the new data with:
- IPCONFIG /ALL
To use the terminal to force IP renewal on Linux:
1. Open a terminal and type the following command to release the current IP address:
- sudo dhclient -r
The connection is ended after the terminal sends a confirmation message.
2. Run dhclient without any IP renewal options:
- sudo dhclient
Change to Public DNS Servers
The DNS servers should be changed to public domain addresses. The following are some common choices:
The primary address is 8.8.8.8, and the secondary address is 8.8.4.4.
The primary address is 1.1.1.1, and the secondary address is 1.0.0.1.
Public domain addresses are generally trustworthy and cost nothing. However, this should only be used as a temporary remedy.
Some public domain DNS servers, on the other hand, block connections from harmful websites. A public DNS could designate a website as questionable, and the public DNS you’re using could ban access to it.
Perform a clean reboot
When computers run for an extended period of time, they become buggy, and a simple restart will not prevent competing programs from interfering with one another.
Perform a “clean” reboot, which will typically resolve DNS difficulties by allowing just required services to start automatically on startup. These steps can help if DNS issues are caused by software errors:
At the same moment, press the Win + R keys.
- Type “MSConfig” in the Run dialog box that appears. You can also open the System
- Configuration app by typing “msconfig” in the search bar at the bottom of the Windows Start Menu and selecting Open.
- Within the System Configuration app, select the Services tab.
- Check Hide all Microsoft services.
- Choose Disable all from the drop-down menu.
- To save your preferences, click the Apply button, then the OK button.
After that, disable programs when they start:
- Select the Start tab from the drop-down menu.
- Open the Task Manager by clicking on it.
- Begin by selecting the Disable option next to the first application. Carry on in this manner until all applications have been disabled.
- Close the program’s window.
- Restart your computer.
- Activate the System Configuration App once again.
- Click on the Services tab.
- Select each application one by one and click to enable it. Check to check if you can connect to the internet once you’ve enabled each app.
This is the one creating DNS troubles if you can reconnect after disabling an application. Troubleshooting advice can be found in the app’s documentation.
Run the Microsoft LLDP Protocol Driver
It’s possible that activating this driver will solve your DNS issues. To use it, follow these steps:
- To access the Quick Link Menu, press the Windows + X keys together. Select Network Connections from the menu. Alternatively, you can bring up your available networks by clicking on the internet icon in your task tray. Select Network and Internet Settings from the drop-down menu.
- Change Connection Properties or Change Adapter Settings are the options.
- Right-click on the connection you’re using in the new window that appears. Choose Properties.
- Look for Microsoft LLDP Protocol Driver on the list. Double-check that the box next to it is checked.
- To exit, click OK.
Update network adapter driver and reinstall if needed
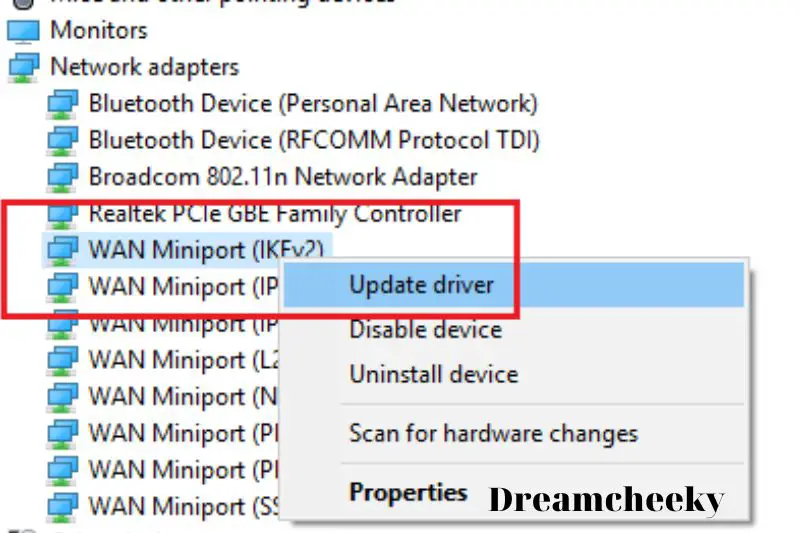
When was the last time you updated your drivers? This could be causing problems, especially if you’ve upgraded your PC’s hardware since purchasing it. You can fix DNS problems by manually searching for network device driver updates and updating them.
To see whether there are any driver updates available, go to:
- Open the Device Manager software by typing devmgmt into the Windows Start Menu search bar.
- Expand the Network Adapters part of the list with a click.
- Right-click on your network device and select Update driver from the drop-down menu.
- Select Automatically search for updated driver software when requested. This could take a few moments to finish.
- Windows will install a driver if one is available.
- Check to see whether the DNS error still occurs after restarting your computer.
You can try reinstalling the driver if this happens. Before you uninstall it, make sure you know what driver you’ll need and how to get it. To be sure, write down the driver’s name, and then do the following:
- Repeat steps 1 and 2 above.
- Locate your driver and select Uninstall with the right-click menu.
- To reinstall your driver, use the software that came with it when you got it from the manufacturer’s website.
- Restart your computer and check your DNS settings once more.
How to Fix the “DNS Server Not Responding” Error in Windows and macOS (10 Methods)

Switch to a Different Browser
The first step in resolving the problem is to check your DNS connectivity. It may be as simple as switching or updating your web browser to resolve this issue.
How Do I Switch to a Different Browser?
To do so, use a different browser to access the internet. If your usual browser is Safari or Google Chrome, for example, use Mozilla Firefox or Microsoft Edge to access the specified website.
If switching browsers works, your default browser will most likely need to be updated or uninstalled and reinstalled. If the “DNS Server Not Responding” notice persists, you can rule out your browser as the source of the problem.
Start Your Computer in Safe Mode
The “DNS Server Not Responding” error message can occur if your operating system is not functioning properly. As a result, you might want to try starting your Windows device in Safe Mode to see if it helps.
This will reduce the number of files and resources required to run Windows, and it can be a useful approach to debug issues.
How to Start My Computer in Safe Mode?
- Select the Windows button, then mouse over the Power icon to start your Windows 10 machine in Safe Mode:
- Next, while you’re holding down the Shift key, select Restart:
- Click Troubleshoot > Advanced in the new window that appears. Select Start-Up Settings, then Restart from the Advanced menu. There will be more alternatives available. Enable
Safe Mode or Enable Safe Mode with Networking can be done by pressing 4 or 5. After that, your computer will restart in Safe Mode.
If you’re running Windows 7 or earlier, go to Power > Restart to restart it in Safe Mode then, while the computer is booting up, press and hold the F8 key.
On macOS devices, the procedure is similar.
Hold down the Shift key while the machine restarts and boots up. You can now release it once the Apple logo is displayed. After that, your device will boot into Safe Mode.
Restart your computer in Safe Mode and try to access the website once more. If the problem doesn’t appear to be caused by a network connection problem, it could be caused by third-party software or an installation, such as an antivirus program.
Temporarily Disable Your Antivirus Software and Firewall
If switching browsers doesn’t fix the “DNS Server Not Responding” problem, the next option is to turn off your firewall for a while. Antivirus software and firewalls are essential for protecting your devices, but they can occasionally cause network connectivity troubles.
How to Temporarily Disable My Antivirus Software and Firewall:
Go to your control panel and navigate to Update & Security > Windows Security > Virus & Threat Protection > Manage Settings for Windows users.
This setting may be found in System Preferences > Security & Privacy > Firewall for Mac users.
After you’ve deactivated your firewall, try viewing the website again in your browser. If this solves the problem, you might want to try a different antivirus product or reconfigure the settings of your current one. In any case, don’t forget to reactivate your firewall when you’re through.
Disable Secondary Connections
If disabling your antivirus software or firewall didn’t solve the problem, another option is to turn off any secondary connections on your device. Make certain that only the connection you’re using right now is active.
What is the procedure for disabling secondary connections?
To do so in Windows, go to your desktop taskbar’s search box and type “Network connections.” After that, select View network connections:
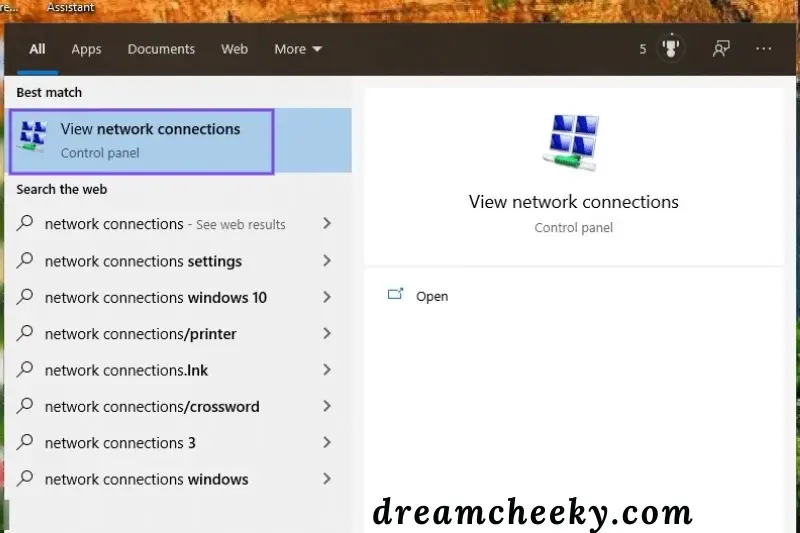
This will take you to the page for Network Connections. A red (X) will appear next to any connections you aren’t using right now. Right-click on one, and then select Disable:
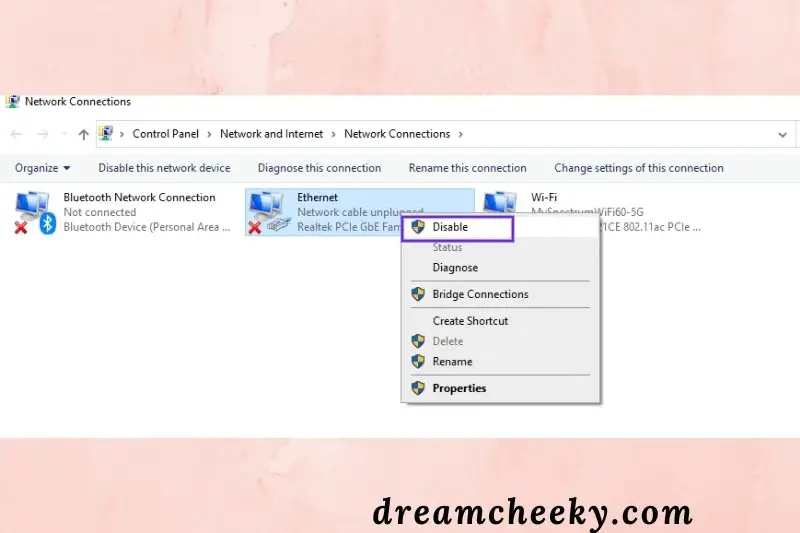
A rep for any additional links that aren’t operational right now. Restart your browser and try accessing the website again after you’ve finished.
If you’re using macOS, go to System Preferences > Network after tapping the Apple icon. On the left side of the window, you’ll see a list of your connections.
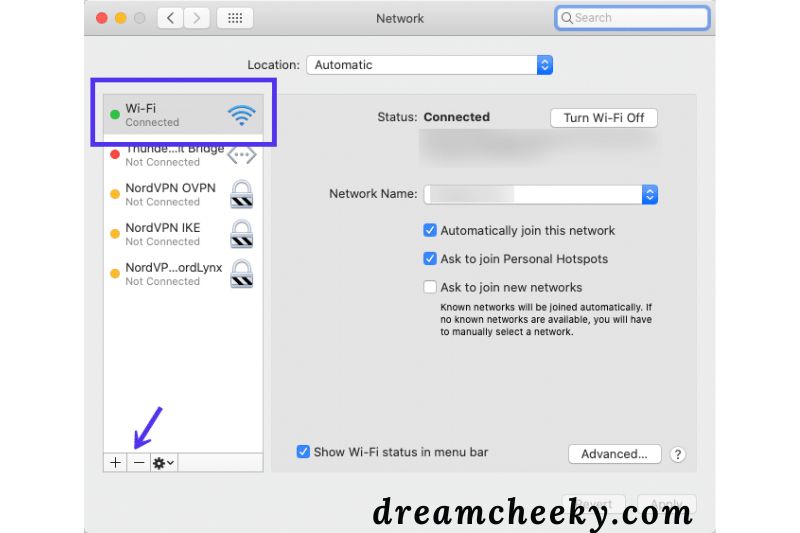
Select one and then click the (–) sign at the bottom of the window to disconnect or disable it.
Disable the Windows Peer-to-Peer Feature
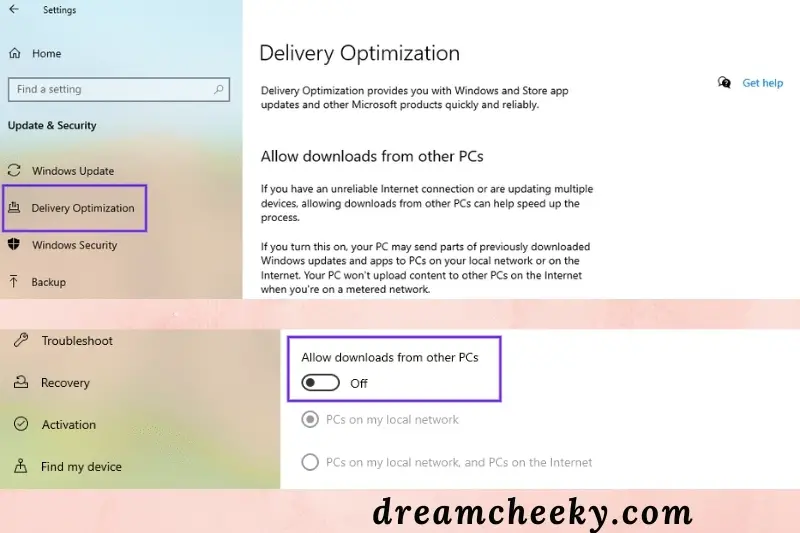
If disabling your firewall or secondary connections doesn’t fix the “DNS Server Not Responding” error message on Windows, there’s one more thing you may try: the Peer-to-Peer (P2P) capability. Note: This feature is only available in Windows 10.
This feature helps you save download bandwidth on your smartphone. Essentially, it allows you to download a Windows update once, then uses your device to spread or share the latest version throughout your local network.
Unfortunately, it can occasionally cause DNS processes to fail. As a result, it’s worth disabling to see if the error message you’re getting goes away.
How Do I Turn Off Windows’ Peer-to-Peer Networking?
To do so, go to the Windows icon, then Settings (gear icon), and then Update & Security:
![]()
Select Delivery Optimization: on the left-hand side of the window that appears.
Toggle the switch next to the ‘Allow downloads from other PCs’ option to disable it:
Restart your computer when you’ve finished and try to access the website again. Don’t worry if this doesn’t work. We still have a few more options to explore.
Restart Your Router
Restarting your router is the next step in the troubleshooting process. This will clear your router’s cache, which may be the solution to the “DNS Server Not Responding” error.
How to Restart My Router
The majority of modems have a power button that allows you to swiftly turn them off. Turn your modem back on after a minute or so and wait for it to re-establish a connection. Once it has, checks to see if you can use your browser to access the internet.
It’s worth noting that merely restarting the router isn’t always sufficient. You could try rebooting it by disconnecting it completely and waiting at least 30 seconds before plugging it back in and turning it on.
Install Updated Network Adapter Drivers on Your Computer
If your current Windows network adapter driver is old or obsolete, you may receive the “DNS Server Not Responding” warning. If this is the case, installing a new adapter driver or updating your existing one could be the answer.
How Do I Install Network Adapter Drivers That Have Been Updated?
You may upgrade your network adapter driver in a few different methods. One option is to do it manually, which you should only do if you have some experience with drivers. You can also use an automated program like Driver Easy or Snappy Driver Installer (SDI) to do it:
Either of these solutions will automatically detect your system and locate the necessary drivers for you to utilize. This method is recommended since it avoids human error, such as downloading or installing the incorrect driver on your device.
Restart your PC after downloading SDI and installing the latest drivers. Then try reconnecting to the internet to see whether the problem has been repaired.
Flush Your DNS Cache and Reset Your IP
After you’ve ruled out your browser, antivirus software, and network as possible causes, it’s time to look into your DNS settings. It’s possible that, like the router cache, your DNS has to be cleared before it can correctly connect to the internet or that your IP needs to be reset.
How Do I Reset My IP Address and Flush the DNS Cache?
If you’re using Windows, start by typing “cmd” into the taskbar’s search area, then choosing the Command Prompt app:
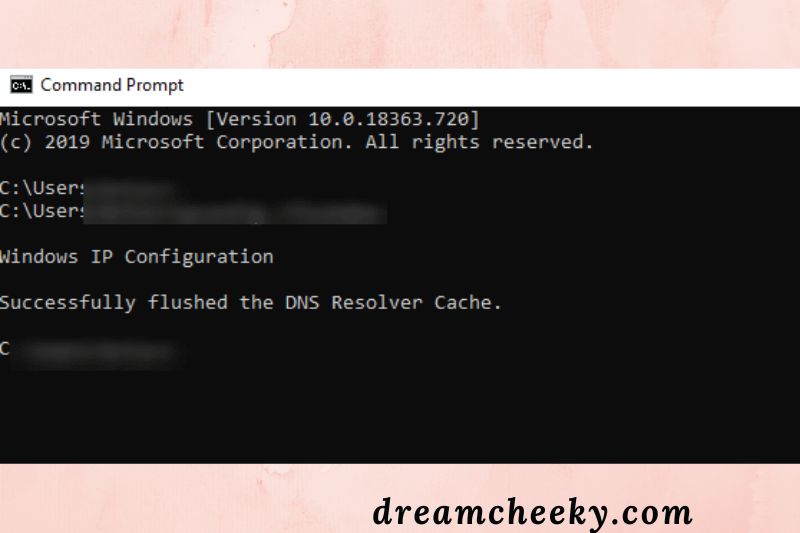
Enter “ipconfig/flushdns” (no quotation marks) in the window that appears and press Enter:
When the operation is complete, a notice will appear stating that the DNS cache has been successfully flushed. Carry on in the same manner with the following commands:
- ipconfig /registerdns
- ipconfig /release
- ipconfig /renew
If you’re using a Mac, use the Terminal application (click the Command + Space keys, then type “Terminal” into Spotlight) to clear your DNS cache. Enter the following in the Terminal application window:
- dscacheutil -flushcache
Press the Enter key. Unlike on Windows devices, there will be no success message. The DNS cache will be flushed simply by performing this Command.
Disable IPv6
IPv6 is the most recent version of the Internet Protocol, which aids in traffic routing between networks and the internet. Unfortunately, it’s also possible that it’s causing the “DNS Server Not Responding” error you’re getting right now.
As a result, removing IPv6 on your machine is another possible approach to attempt.
How Do I Turn Off IPv6?
Open the Network Connections control panel in Windows, then right-click on your existing connection. Select Properties: from the drop-down menu.
Scroll down until you see Internet Protocol Version 6 (TCP/IPv6): Internet Under the Networking tab of the panel that opens, scroll down until you see Internet Protocol Version 6 (TCP/IPv6):
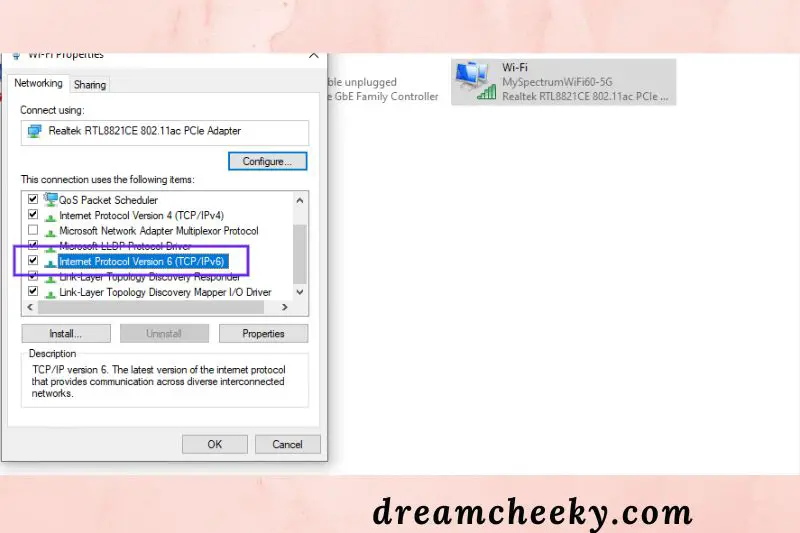
Uncheck the box if it’s checked, then click OK. Restart your browser and attempt again to connect to the internet.
To turn off IPv6 in macOS, you must first figure out which network interface you’re using. To accomplish so, launch the Terminal program and type the following command:
- networksetup -listallnetworkservices
You would use the following command to disable IPv6 for a wireless connection:
- networksetup -setv6off Wi-Fi
You’d use the following for an Ethernet connection:
- networksetup -setv6off Ethernet
Then press Enter and reload your browser to see whether the problem has been addressed.
Change the Default DNS Server on Your Windows Computer
Changing your default DNS server is another option for resolving “DNS Server Not Responding” in Windows. The first step is to open your network connection properties in Windows 7, 8, or 10.
What Is the Process for Changing the Default DNS Server?
Begin by hitting the Windows button in the task bar’s bottom-left corner. Type “Network connections” into the search area, and then pick View network connections from the menu that appears:
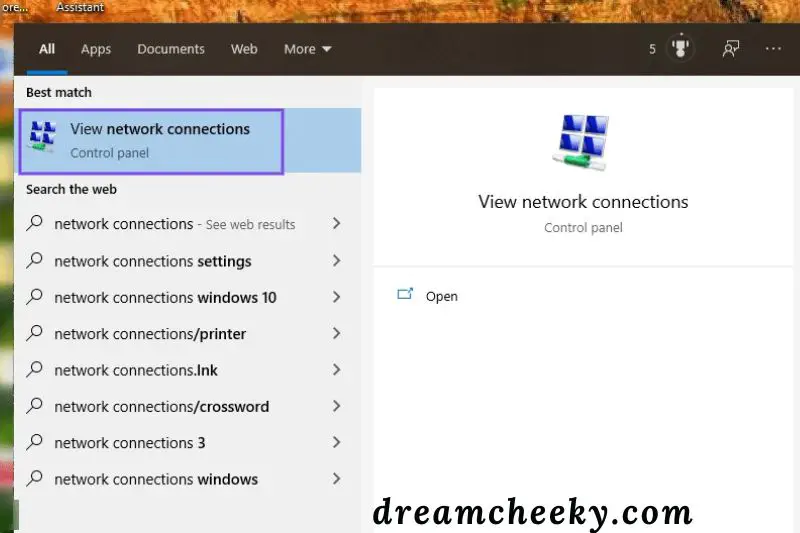
After there, select the internet adapter that you’re currently using (WLAN for wireless network connections or LAN for ethernet cable connections). Select Properties from the context menu of the internet adapter by right-clicking on it.
Choose Internet Protocol Version 4 (TCP/IPv4) in the pop-up window, then click the Properties button.
Select a different DNS server address to assign manually. Use the following DNS server addresses and substitute another server’s address:
For example, under Preferred DNS server, you can enter Google’s DNS server, which is “8.8.8.8.” Then, under the Alternative DNS server, type “8.8.4.4” and click OK.
If you’re using macOS, you can locate these settings by clicking on the Apple icon followed by System Preferences:

Select the Network icon next. After that, select your current network and click the Advanced button.
Click the (+) button next to “IPv4 or IPv6 addresses” on the DNS tab, then press Enter:
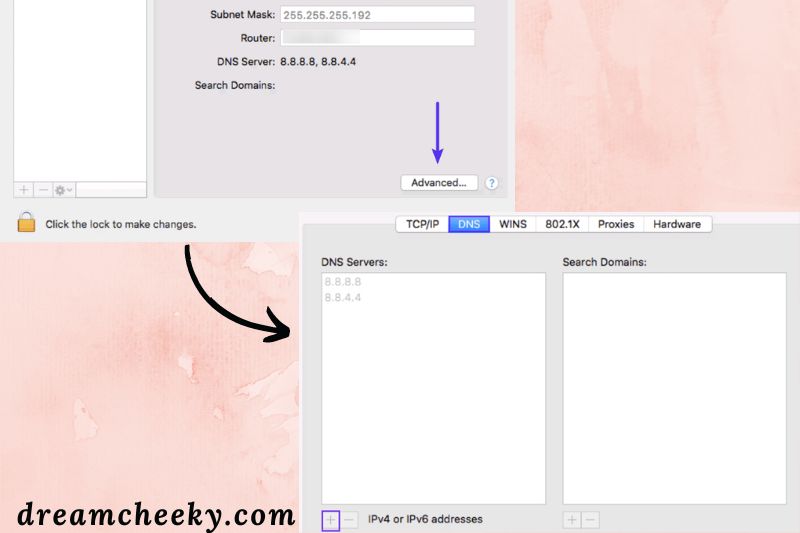
After you’ve entered your new DNS information, click OK, then Apply. Restart your browser and go to the website you were trying to reach. The issue with the “DNS Server Not Responding” should now be rectified.
Conclusion
DNS errors can be frustrating and difficult to fix; Dreamcheeky hopes that our guide can help you deal with your problems. If you have any questions, feel free to contact us. Thank you for reading.

